1. Welcome
DuoVox transcribes speech in real time and translates it on the fly, so two people who don't share a language can follow a live, two-way conversation on a single Windows PC. It is built for interpreters, clinics, classrooms, support desks, businesses and families.
As each person speaks, DuoVox shows a live transcript of what was said and, alongside it, a running translation. It can caption a call or video playing on your computer, or your own microphone. It can also subtitle a media file after the fact, and translate whole documents.
This guide covers everything from your first session to the built-in tools, with screenshots from the real app alongside the text. Use the clickable Contents page (or your PDF reader's bookmarks panel) to jump to any section.
2. Installation & First Run
- Microsoft Store: one-click install, automatic updates, signed by Microsoft. Find it from duovox.net.
On first launch DuoVox shows the Terms of Use and asks you to accept them before the main window opens; this happens once, and again only if the terms change. After that the interface starts in English; you can switch it to any of the supported languages at any time from the globe icon in the toolbar.
3. A Live Conversation
Set your audio source, then press Start (or Ctrl+Alt+S). DuoVox begins listening and filling the caption panels with the transcript and, alongside it, the translation. Press Stop to end the session.
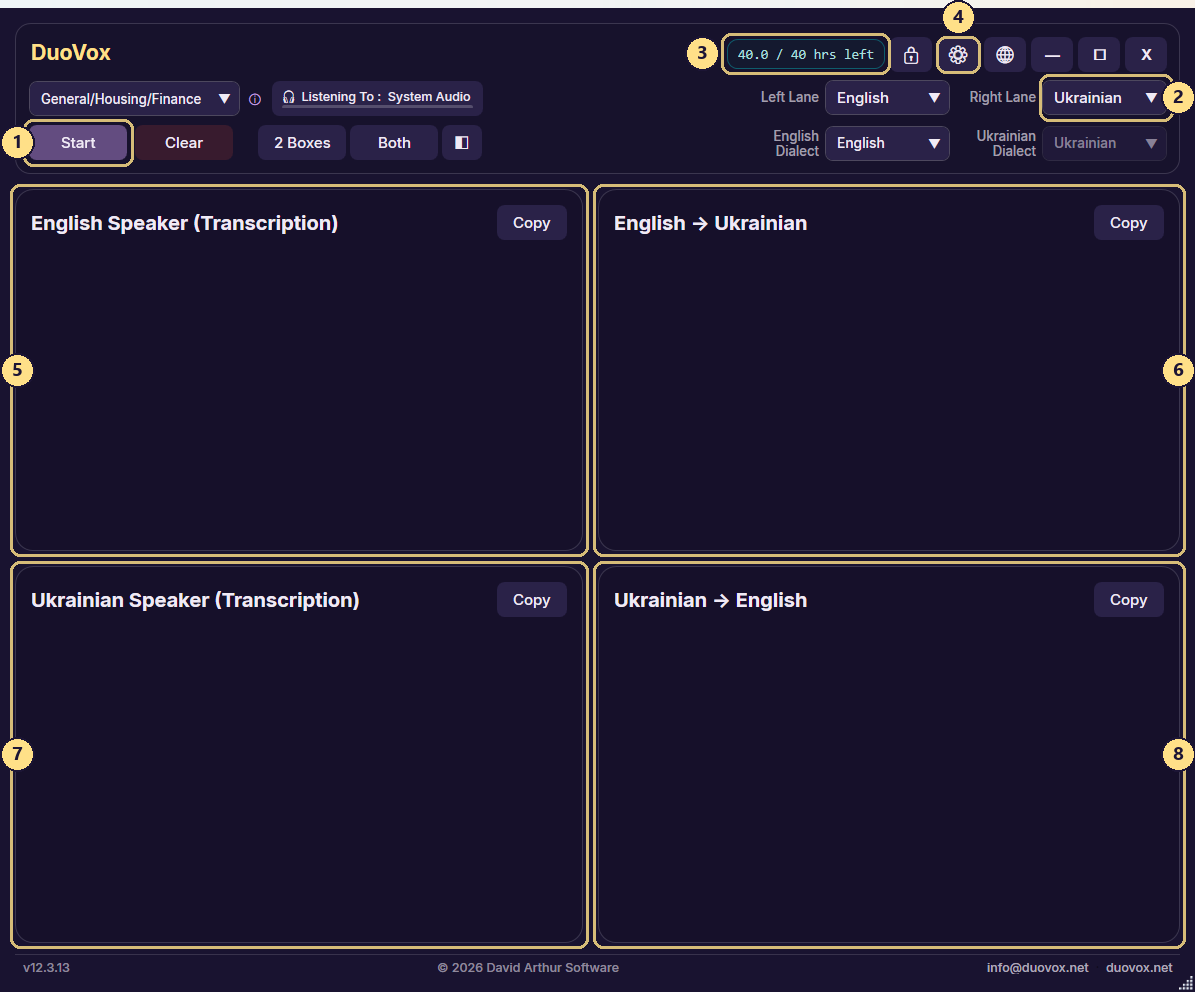
- 1Start / Stop
- 2Target-language selector
- 3Hours remaining
- 4Menu
- 5Primary speaker transcript
- 6Primary translation
- 7Other speaker transcript
- 8Other translation
Choosing the audio source
The toolbar shows what DuoVox is currently listening to (for example “Listening To: System Audio”); the thin green bar under it moves while sound is coming in. Click that button to cycle through the three sources:
- System Audio: captions a call, meeting or video playing on your PC (Teams, Zoom, YouTube, etc.).
- PC / Desk Mic: captions people speaking in the room, through the microphone built into your laptop or a microphone sitting on the desk.
- Headset Mic: captions your own voice through a headset microphone worn close to the mouth.
- If you see a "no audio" message, switch the source so it matches where the sound is actually coming from.
Which device DuoVox actually records from is a separate choice, made in the menu under Audio → Audio input device. The list follows the source you picked: on PC / Desk Mic or Headset Mic it lists your microphones, headed by (Default microphone); on System Audio it lists playback devices, headed by (Default – System audio). Leave it on the default entry to follow the recording device Windows is set to use, or pick a specific microphone from the list if you have more than one connected.
Primary & target languages
A conversation has two sides, chosen from the two language selectors at the right of the toolbar, each headed with the caption pane it fills. Either side can be any supported language, in either direction – DuoVox does not treat one language as the “main” one. The globe icon is separate: it changes the language of DuoVox's own menus and buttons, not the language of the conversation.
- 2-box mode: shows one speaker and the translation; flip the direction with a button.
- 4-box mode: shows both speakers transcribed and translated at once, ideal for a true two-way conversation (as in the screenshot above).
Topic & Dialect (Standard and above)
On the paid plans, three selectors help DuoVox recognise the right words for your conversation. Topic sits on the left, above the Start button; the two Dialect selectors sit directly beneath the language they belong to, so each column reads downwards: the side, then its language, then its dialect.
- Topic: the subject of the conversation (for example General / Housing / Finance, Medical, or Legal). DuoVox favours that field's specialist vocabulary so terms are transcribed more accurately.
- Dialect – one for each side of the conversation, directly under that side's language and labelled with it, so you might see English Dialect under the left language and Arabic Dialect under the right. Setting them independently is the point: a London clinic can run British English against Tunisian Arabic in the same session, which a single shared setting could never express.
A dialect changes spelling and word choice to match local usage – British versus American English, for example. Not every language has regional variants; when the one you have chosen does not, its selector is greyed out and a tooltip explains why.
4. Layout & Appearance
DuoVox's caption area is fully configurable: choose how many panes are visible, whether you see transcripts, translations or both, rearrange which pane sits where, and change the look of the window itself.
Box count and display mode
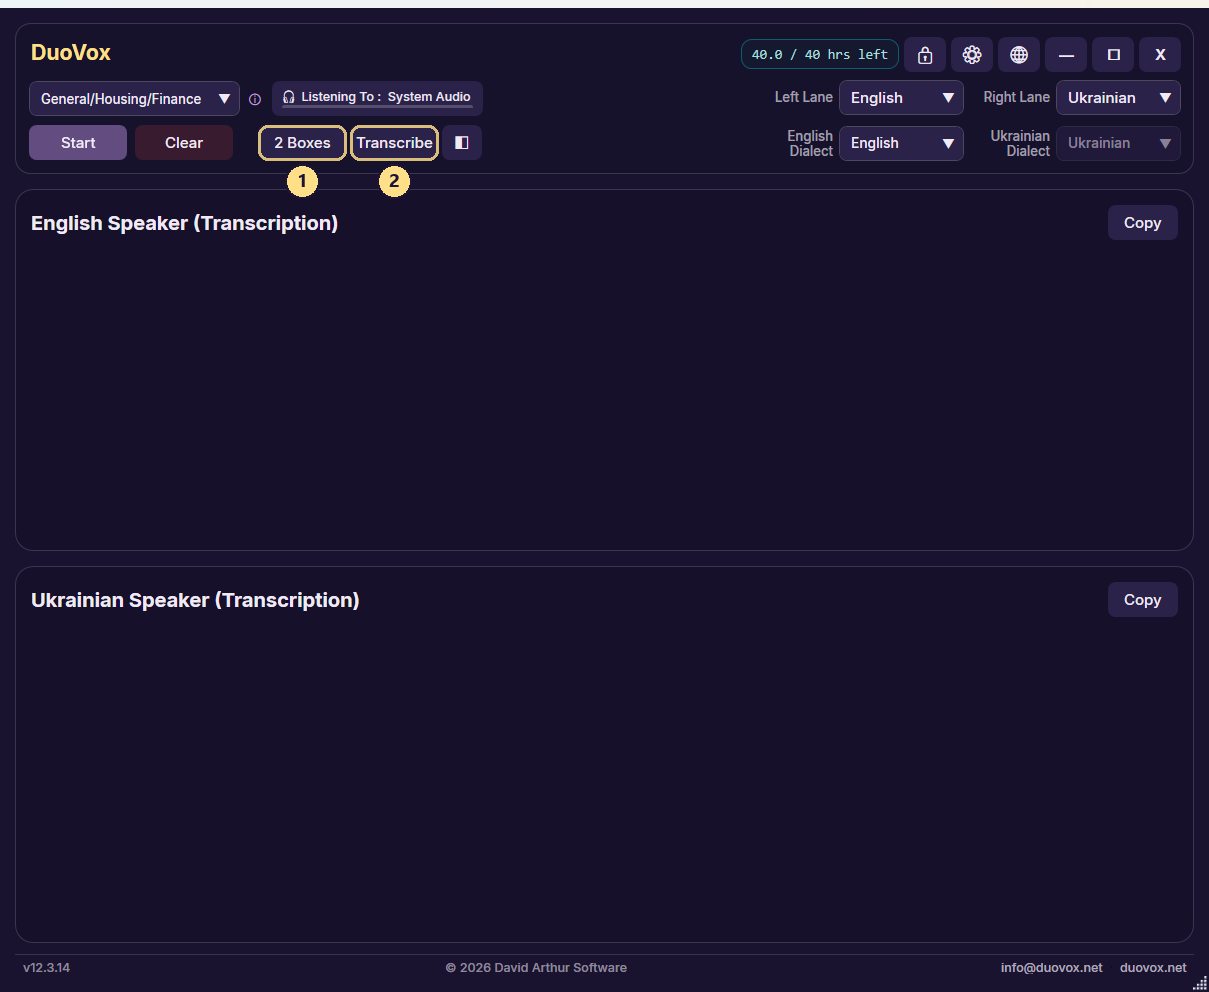
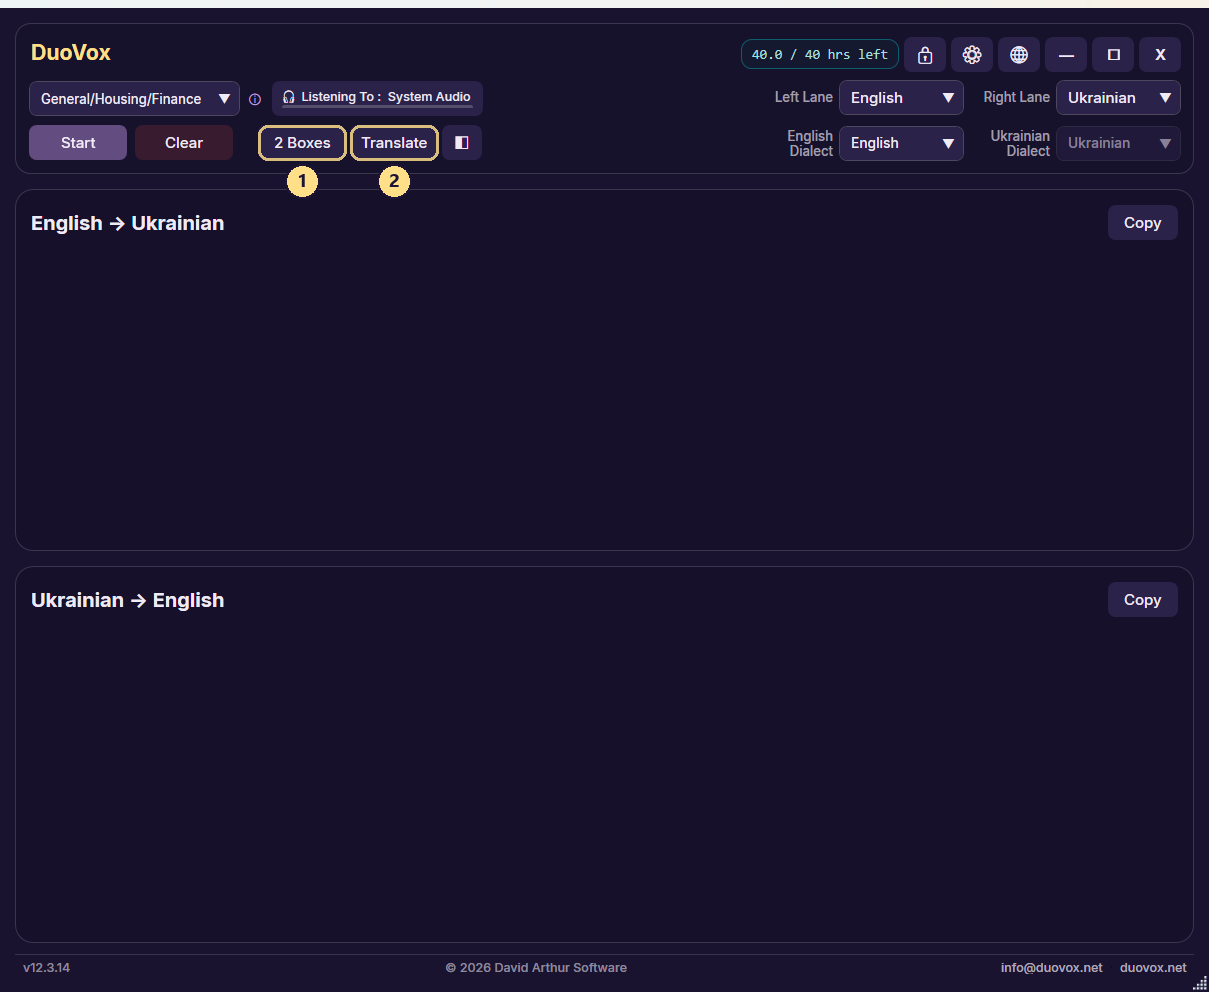
Two independent toolbar buttons control what the caption area shows. The 4 Boxes / 2 Boxes button (1, Ctrl+Alt+R) sets how many panes are visible, and its label always shows the count you will switch to – so it reads “2 Boxes” while you are currently in 4-box view, and “4 Boxes” while you are in 2-box view. The button beside it cycles the display mode through Both → Transcribe → Translate (2), and its label shows whichever mode is currently active.
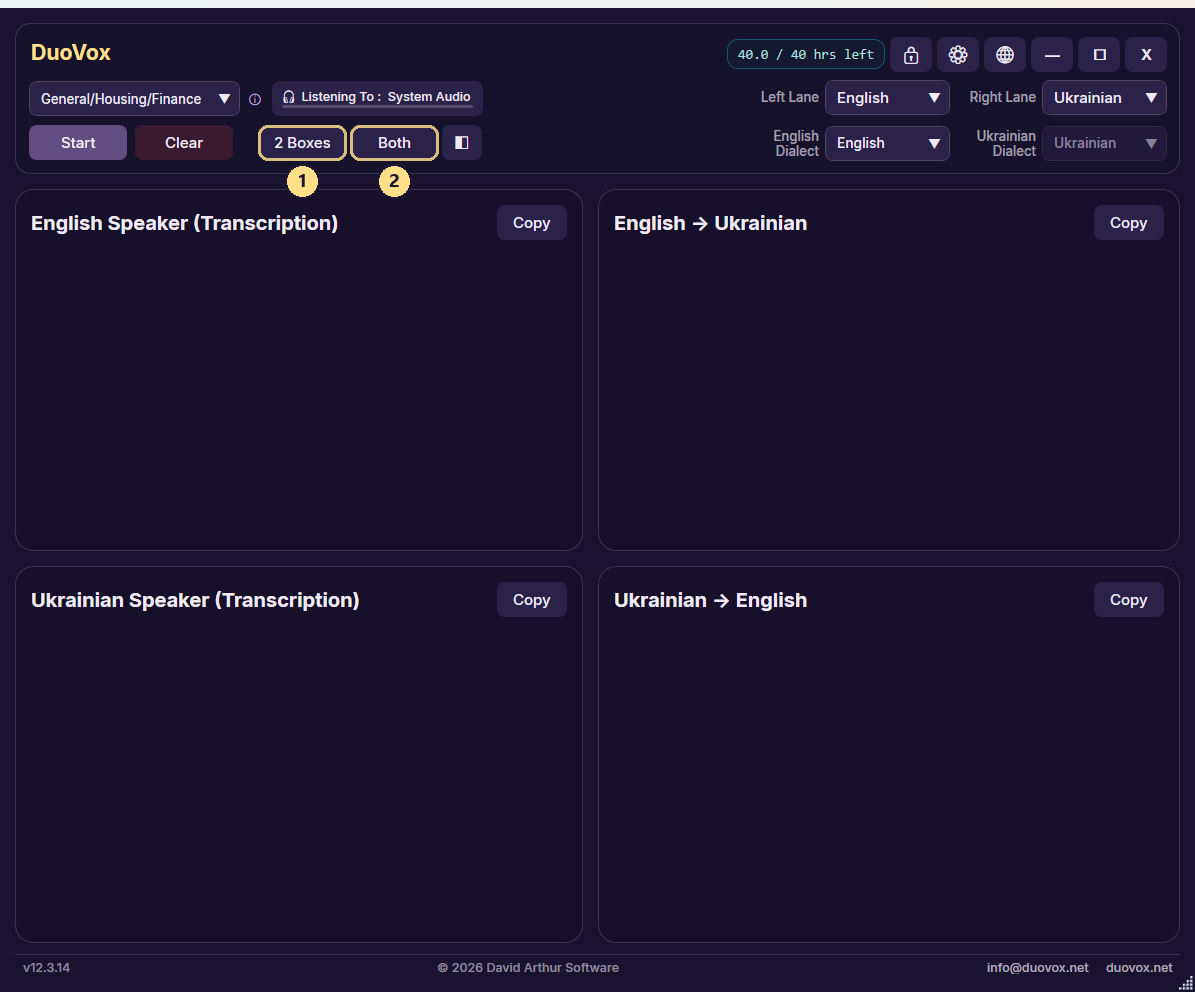
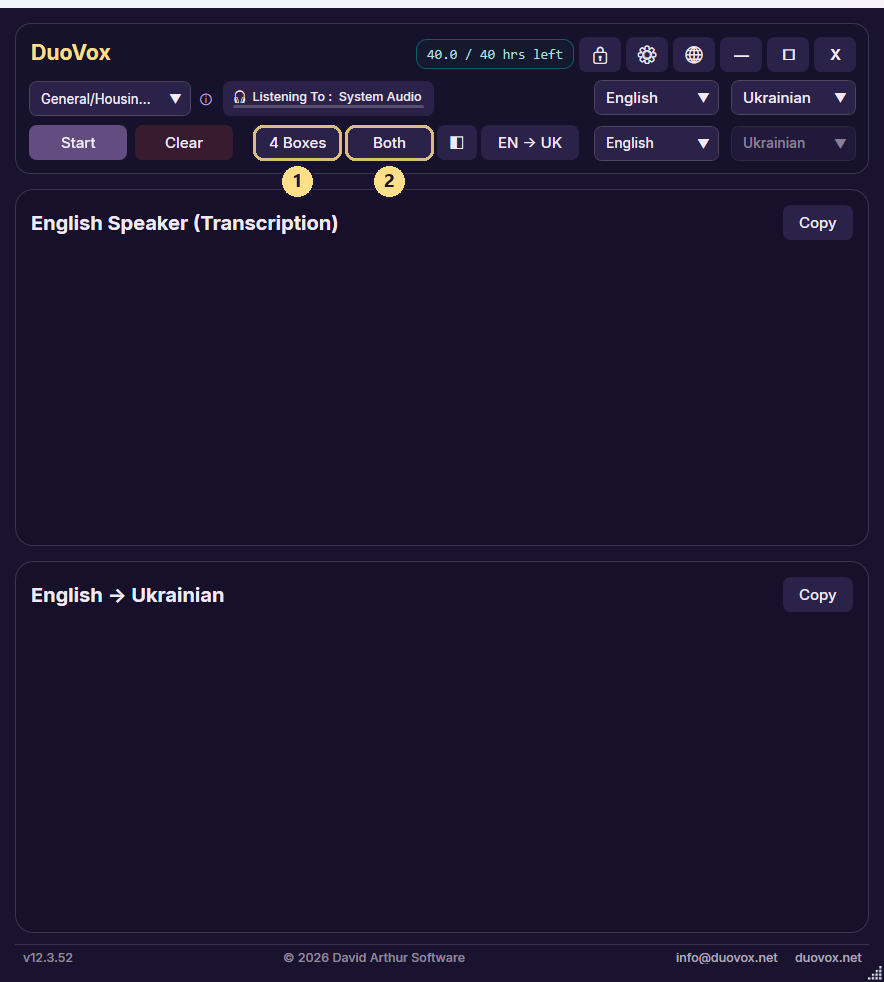
Switching to 2 Boxes also narrows the window itself and collapses the language-pair display to a compact form (for example “EN → UK”) so it still fits – handy for keeping DuoVox open beside other work rather than as a full-width panel.
The display-mode button hides whichever half you don't need: Transcribe shows only the transcript box(es) and hides every translation; Translate does the reverse, showing only the translation box(es).
Pane arrangement
Panes can also be rearranged, for example placing a speaker's transcript directly beside its translation instead of underneath it.
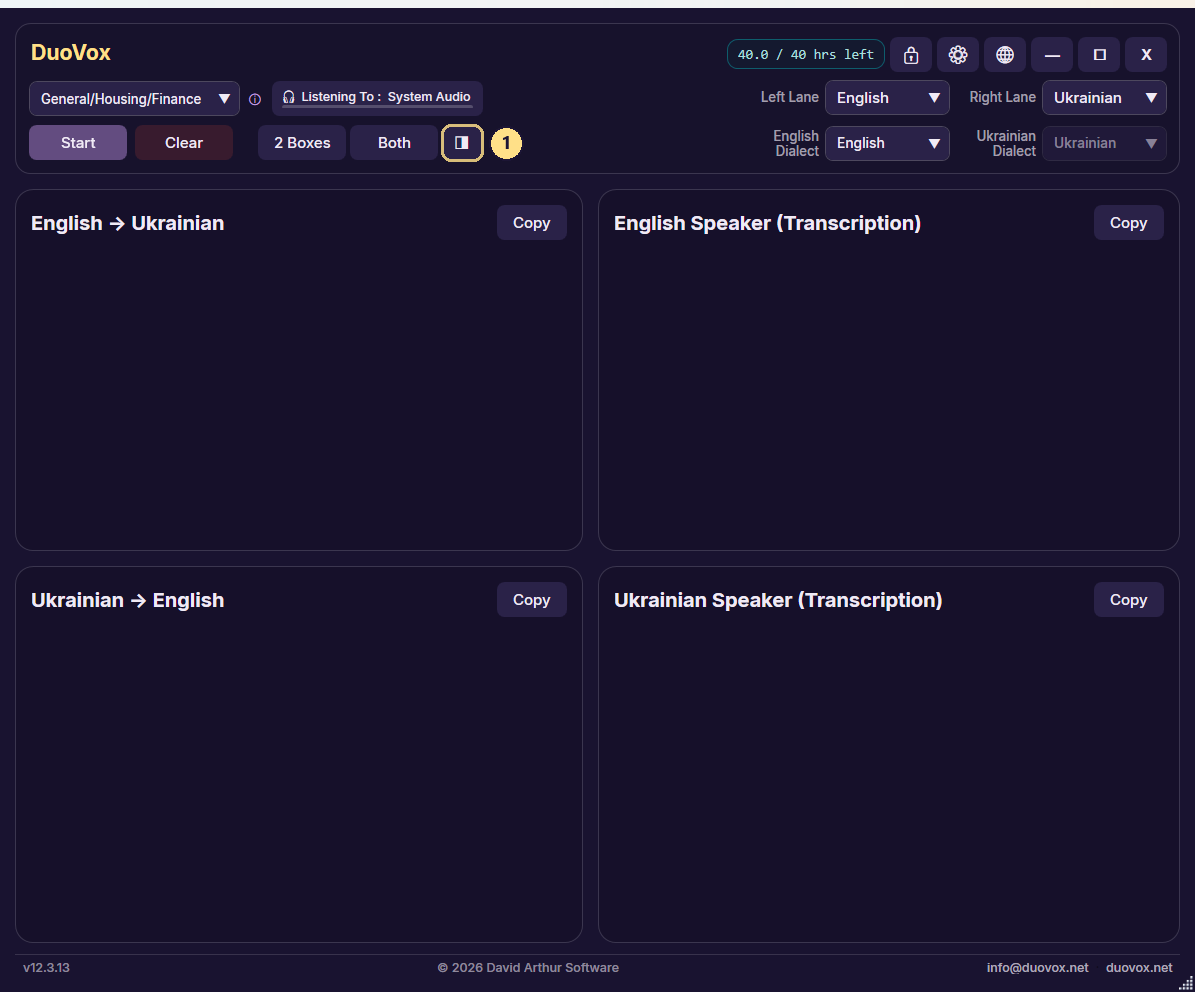
- 1Pane arrangement button
Appearance
Open the menu (gear icon, top-right), then Display > Appearance to change how DuoVox looks.
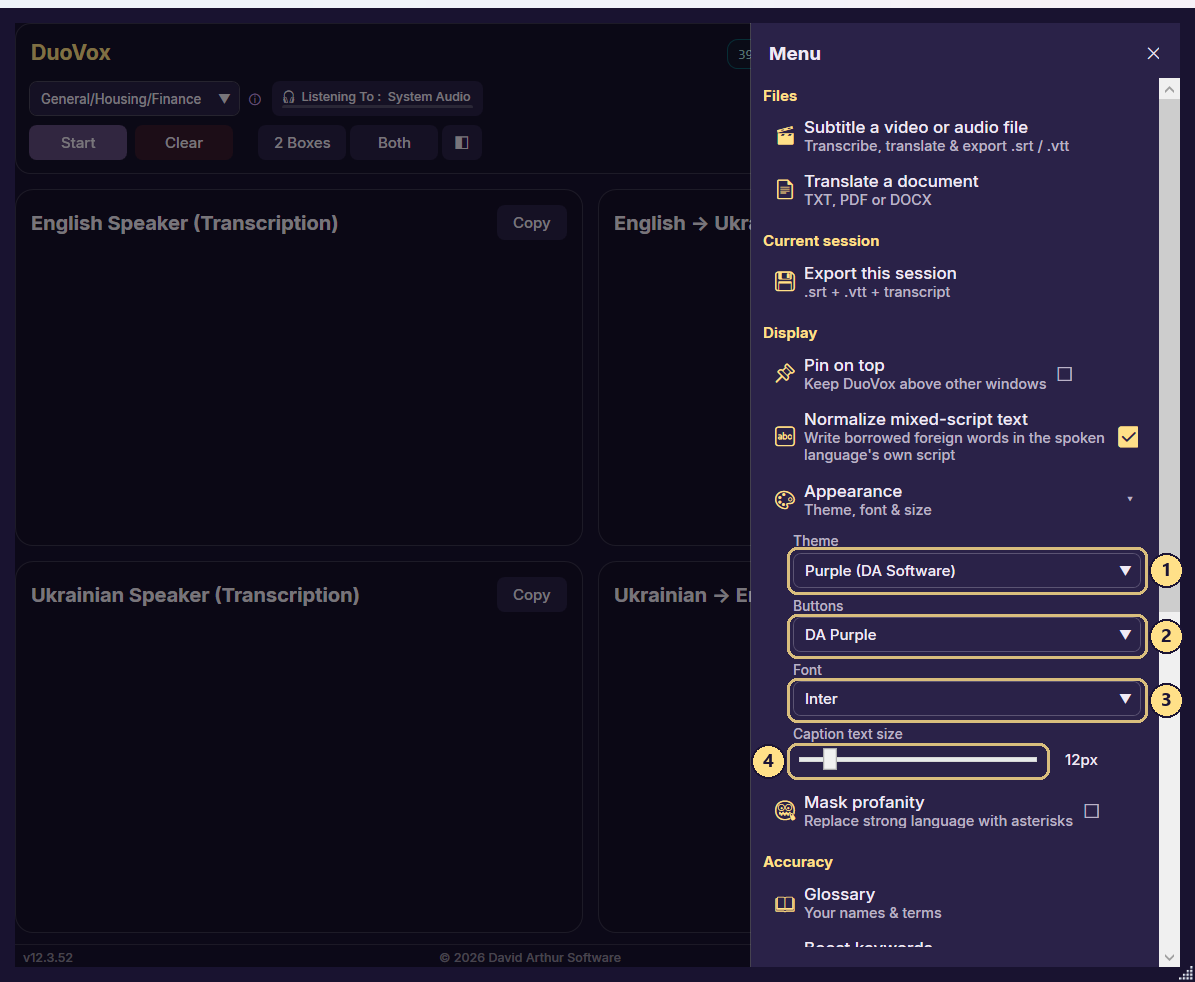
- 1Theme
- 2Buttons – the button style
- 3Font – the caption font
- 4Caption text size
- Pin keeps the DuoVox window always on top of other apps (Ctrl+Alt+T).
- Clear resets the captions and the subtitle clock (Ctrl+Alt+C).
Normalize mixed-script text
People often drop an English word into a sentence in their own language – and when they do, it is usually written back in English letters, in the middle of a sentence that is otherwise in its own alphabet. The line still reads correctly, but it looks untidy:
- Heard as: “У мене appointment о третій”
- Tidied to: “У мене епойнтмент о третій”
The word is not translated or changed – it is simply spelled in the alphabet of the language being spoken, so the whole line reads in one script. Names and brands (Microsoft, iPhone, NASA) are deliberately left as they are, because that is how people expect to see them.
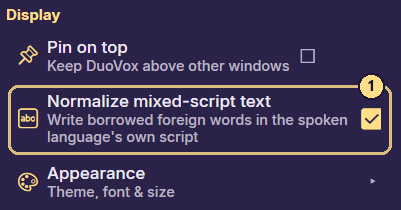
- 1Normalize mixed-script text – a ticked box means it is on
- It is found under Display > Normalize mixed-script text on a Standard or Professional plan, where it is already switched on. Unlike Topic and Dialect, the row is not shown at all on the Free plan.
- The box at the right of the menu row is ticked when it is on and empty when it is off. Select the row to change it.
- It needs an internet connection and a Standard or Professional plan, so it does not run on the Free plan or while DuoVox is working offline.
- It only affects lines that genuinely mix two alphabets, so most conversations never trigger it. The line appears as heard first, then tidies itself a moment later.
Mask profanity
Captions are often on show to more than the person reading them – a waiting room, a classroom, a shared screen in a meeting. Mask profanity replaces strong language with asterisks, so the line still reads naturally without putting the words themselves on screen.
- It is found under Display > Mask profanity, and starts switched off.
- It works on every plan, including Free and while DuoVox is running offline – unlike Normalize mixed-script text above, which needs a connection and a paid plan.
- Masking is applied as each line is produced, so it carries through everywhere the words would otherwise appear: the caption on screen, the translation beside it, and any file you export.
- Only whole words are masked, so ordinary place names, surnames and medical terms are not starred out by accident. Chinese and Japanese are matched differently, because they are written without spaces between words.
- The word lists are deliberately conservative and cover the strongest terms in each language. A word that slips through is easier to live with than an ordinary one wrongly hidden.
5. Accuracy Tools (Professional)
Open the menu's Accuracy group to teach DuoVox the specialist vocabulary of your conversation (names, medical or legal terms, acronyms and jargon) so they come through correctly instead of being misheard.
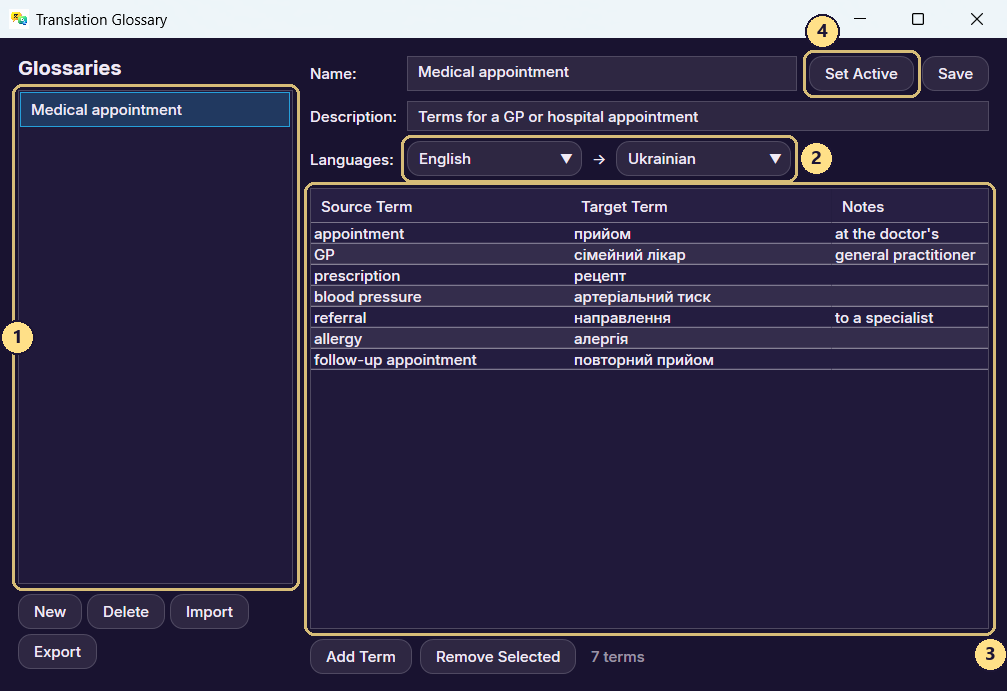
- 1Glossary list (saved profiles)
- 2Language pair for this glossary
- 3Term table (source, target, notes)
- 4Set Active (use in your session)
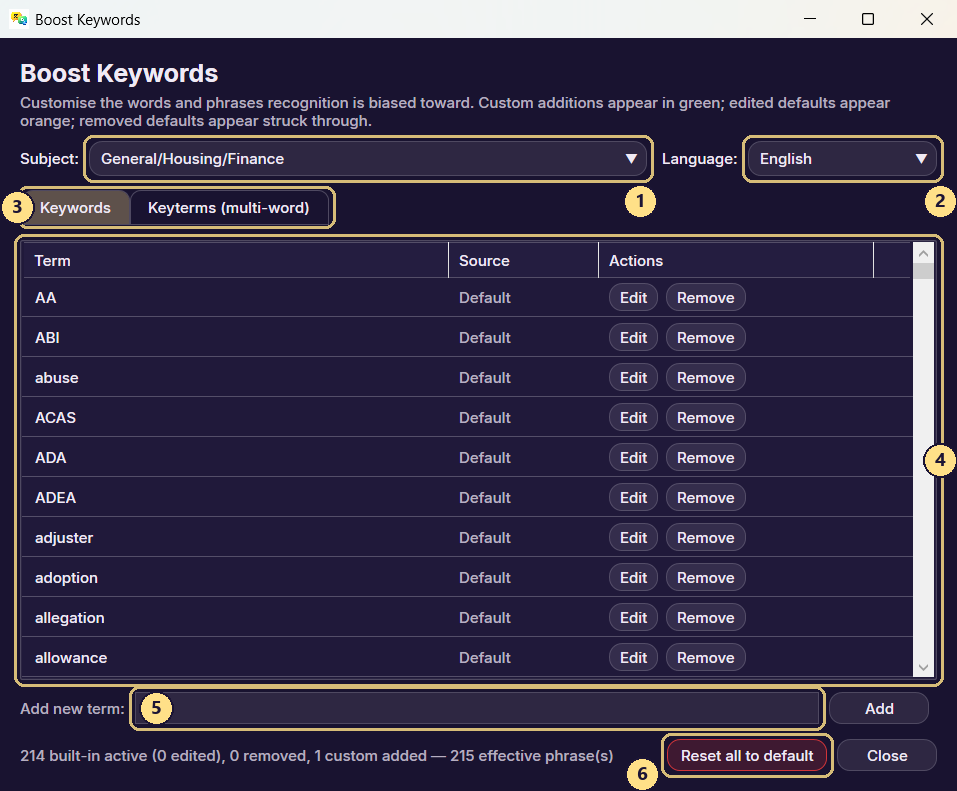
- 1Subject
- 2Language
- 3Keywords / Keyterms tabs
- 4Term list
- 5Add a new term
- 6Reset all to default
6. Working with Files
Subtitle a video or audio file (Professional)
Open the menu's Files group and choose Subtitle a video or audio file (the clapperboard icon) to transcribe, and optionally translate, an existing recording rather than a live source. A standard Windows file chooser opens. Pick the recording and DuoVox first shows how long it is and how much of your monthly allowance is left – subtitling a file uses your included hours, just as a live session does. Confirm, and the subtitle window opens, shown below.
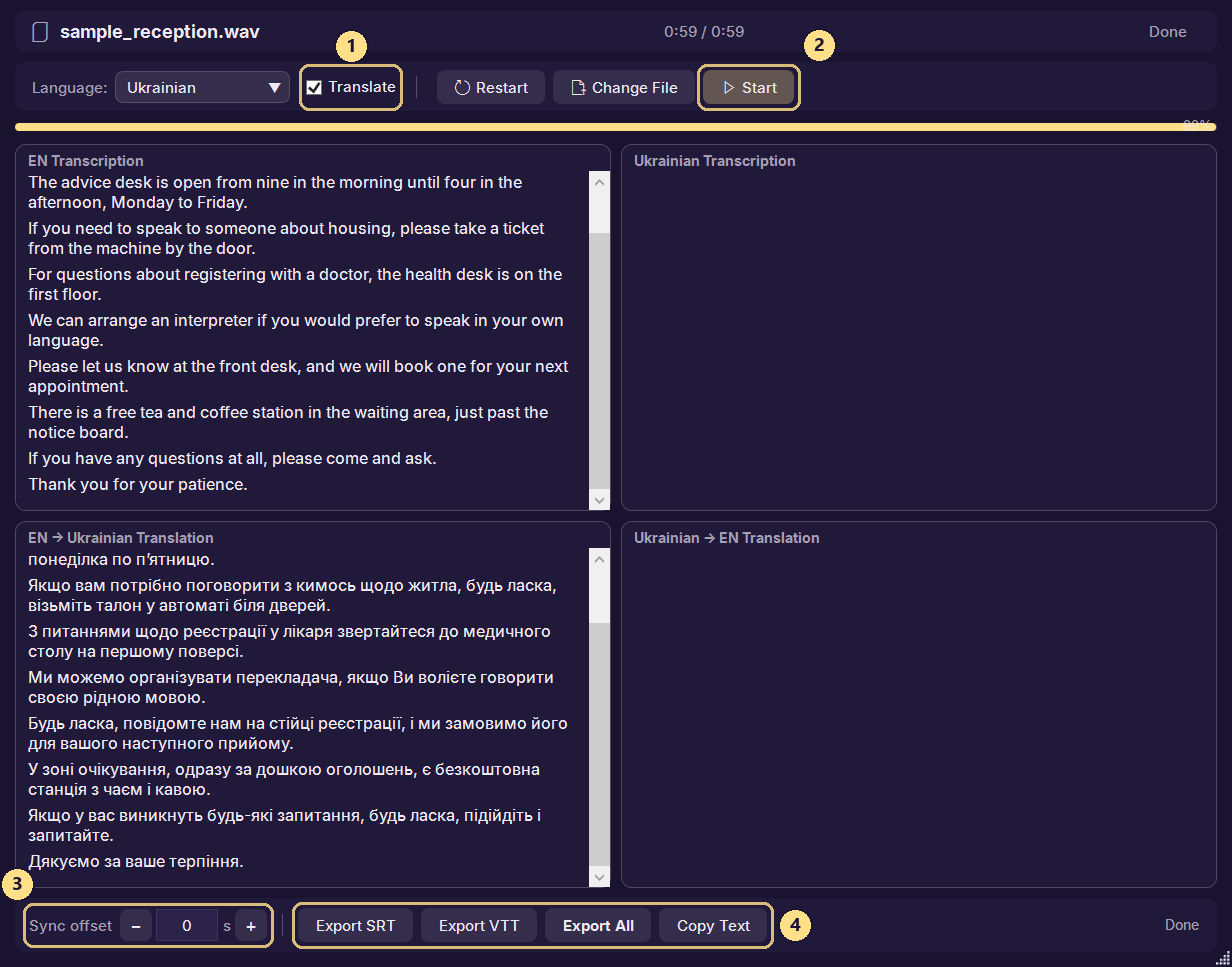
- 1Translate on / off
- 2Start
- 3Sync offset
- 4Export and copy buttons
Translate a document (Standard and above)
Choose Translate a document from the same Files group to translate a whole TXT, PDF or DOCX file, rather than a spoken conversation. A file chooser opens for you to pick the document. The document window opens with the text loaded; choose your target language and press Start Translation. Once it finishes, the original and translated text appear side by side, as shown below.
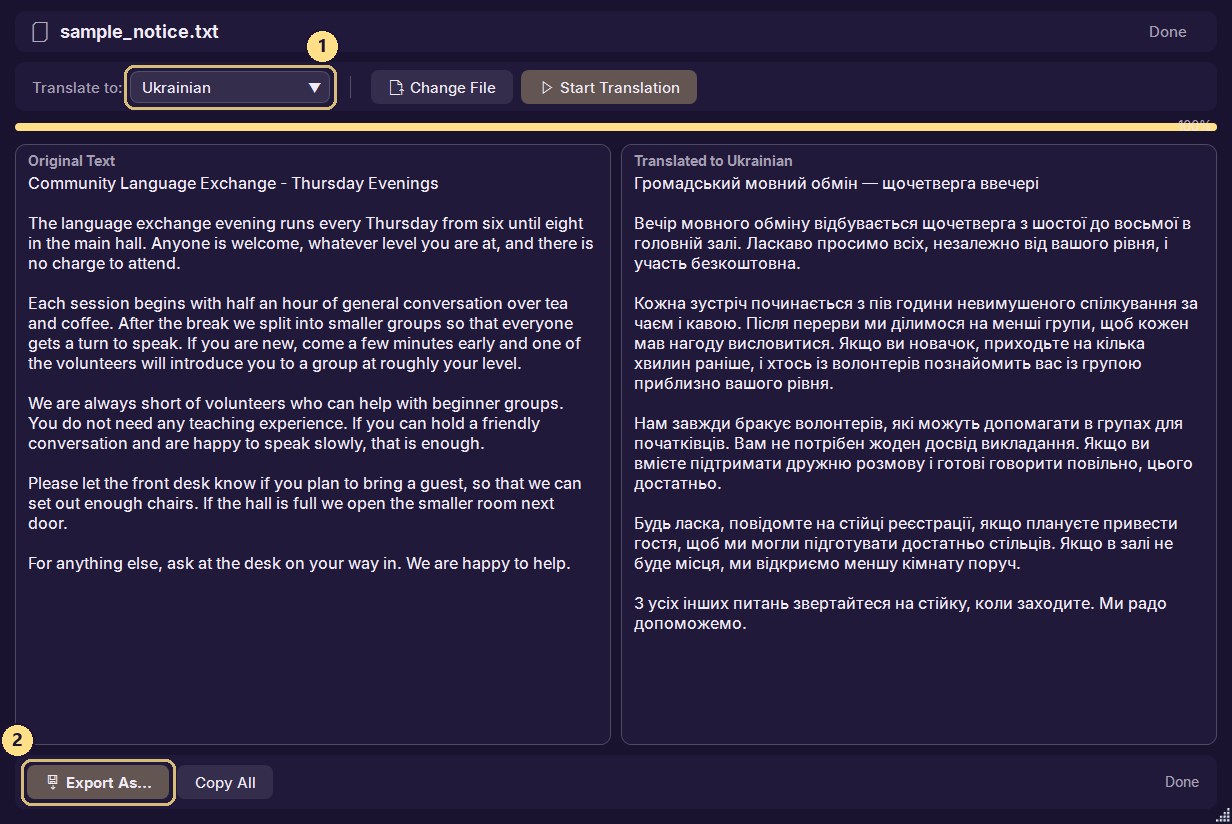
- 1Target language
- 2Export As
7. Exporting Your Session
The menu's Current session group holds Export this session (Ctrl+Alt+E), which saves the live conversation you just ran as subtitles (.srt, plus .vtt for browsers and streaming tools) and a plain-text transcript log (.txt). Exporting is a Professional feature.
Exports are saved to Documents\CaptionOverlay\Exports. Move anything you want to keep for the long term: DuoVox tidies that folder for you, clearing exports older than 90 days.
This is different from subtitling a file, described above: Export this session saves the conversation you have been running live in DuoVox, while Subtitle a video or audio file processes a separate recording you already have on disk.
Each caption panel has its own Copy button in its header, on every plan. It copies that panel's text to the clipboard without saving a file, for pasting straight into another app – copy the panels you want one at a time, or use Export this session to save them all at once.
8. Languages & Language Packs
DuoVox offers 49 languages: 43 are captioned on Professional, 33 on Standard, and 30 work offline on Free. Either side of a conversation can use any language your plan captions.
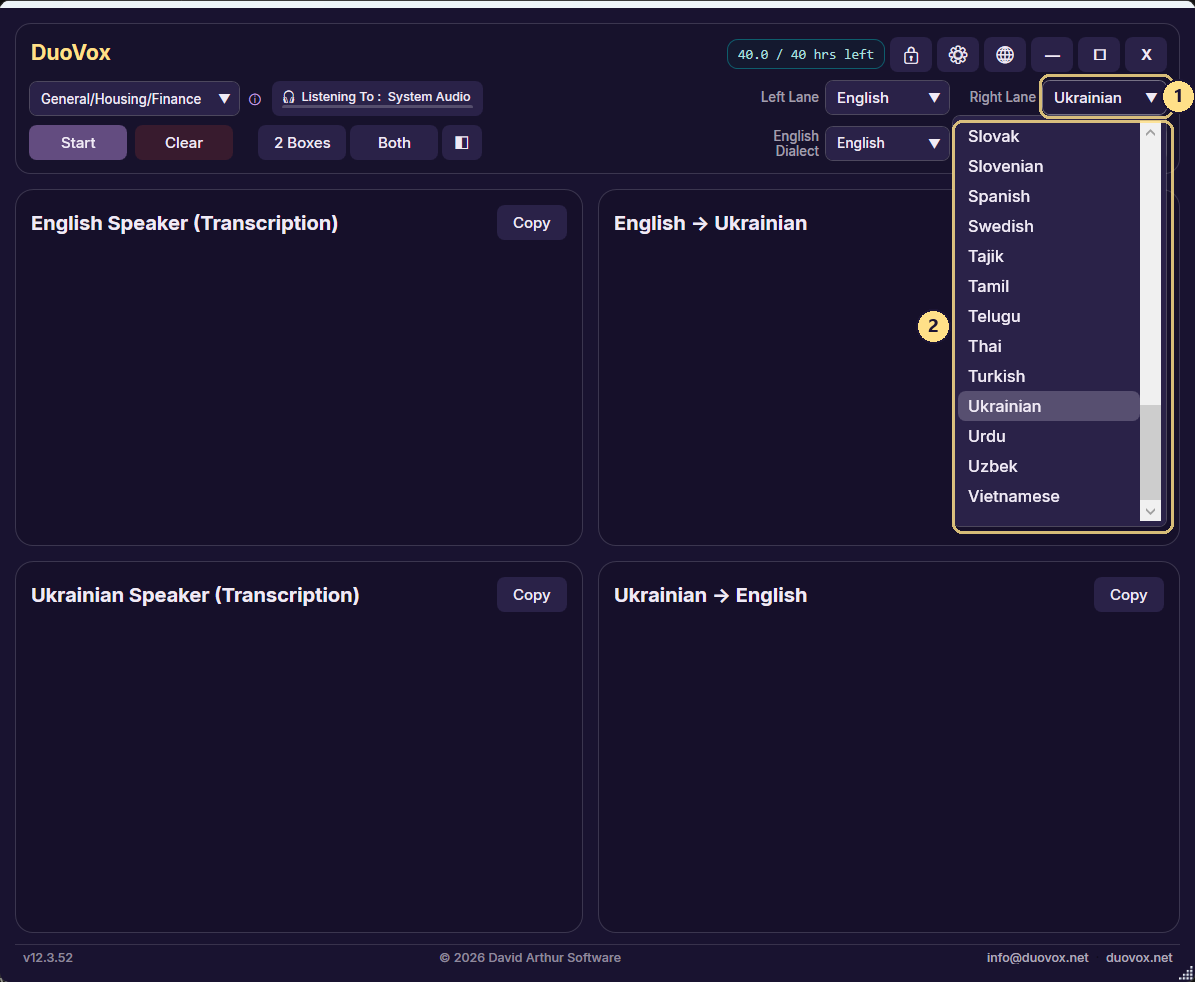
- 1Target-language selector
- 2The full language list
Not every language works the same way on every plan, so DuoVox tells you before a session rather than after. If you pick a language your plan cannot caption, a short notice appears naming the language and what it would need – for example that it cannot be captioned offline and needs Standard or Professional, or that a language is available on Professional only. Some languages can be translated into even when speech in that language cannot be captioned, and the notice says so rather than leaving you to guess.
The same notice appears when you start a session with a language pair you saved earlier, so a pair that no longer suits your plan cannot sit there silently producing nothing. A full per-plan list of every language is published at duovox.net/languages.
Open the menu's Settings & advanced group and choose Download Languages to manage the on-device speech models DuoVox uses for the Free plan's fully offline mode, and as an automatic fallback if your internet connection drops during a paid session.
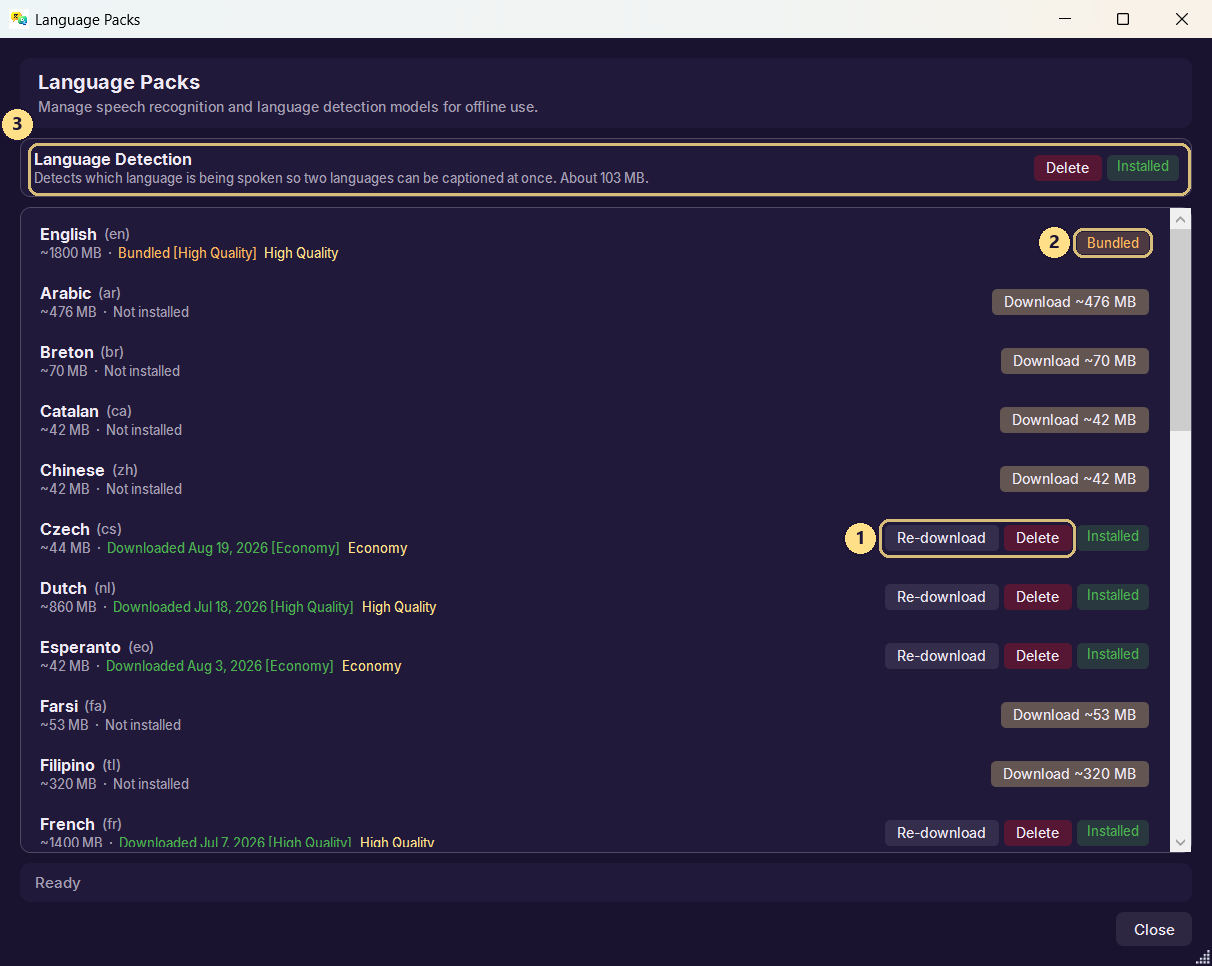
- 1Re-download or delete a pack
- 2Install status
- 3Language detection model
9. Plans & What Each Unlocks
DuoVox offers a Free plan and paid plans, and it is designed never to leave you stuck:
- Free: transcription and translation, running entirely on your own PC. No internet connection and no account needed, unlimited use, but lower accuracy than the paid plans and none of the paid-only features below. Download the language packs you need first (see section 8).
- Standard: online AI speech recognition and translation, a set number of hours included each month – a large accuracy gain over the offline engine.
- Professional: our most accurate speech recognition and translation, the widest language coverage, and every feature in this guide.
If your internet drops, DuoVox keeps working in free offline on-device mode and returns to your plan's AI by itself as soon as the connection is back. If instead you reach your monthly hours, it stays in free offline mode for the rest of that session; hours you buy apply from the next one. Nothing is ever bought without you confirming it in the Microsoft Store. The header shows your remaining hours on a paid plan, and when you reach a cap you simply choose: buy more hours (Pay As You Go), continue offline, or end the session. If you switch on One-tap top-up (in the menu, under Settings & advanced) and set your own monthly limit, DuoVox offers the purchase straight away instead, and stops offering once you reach that limit.
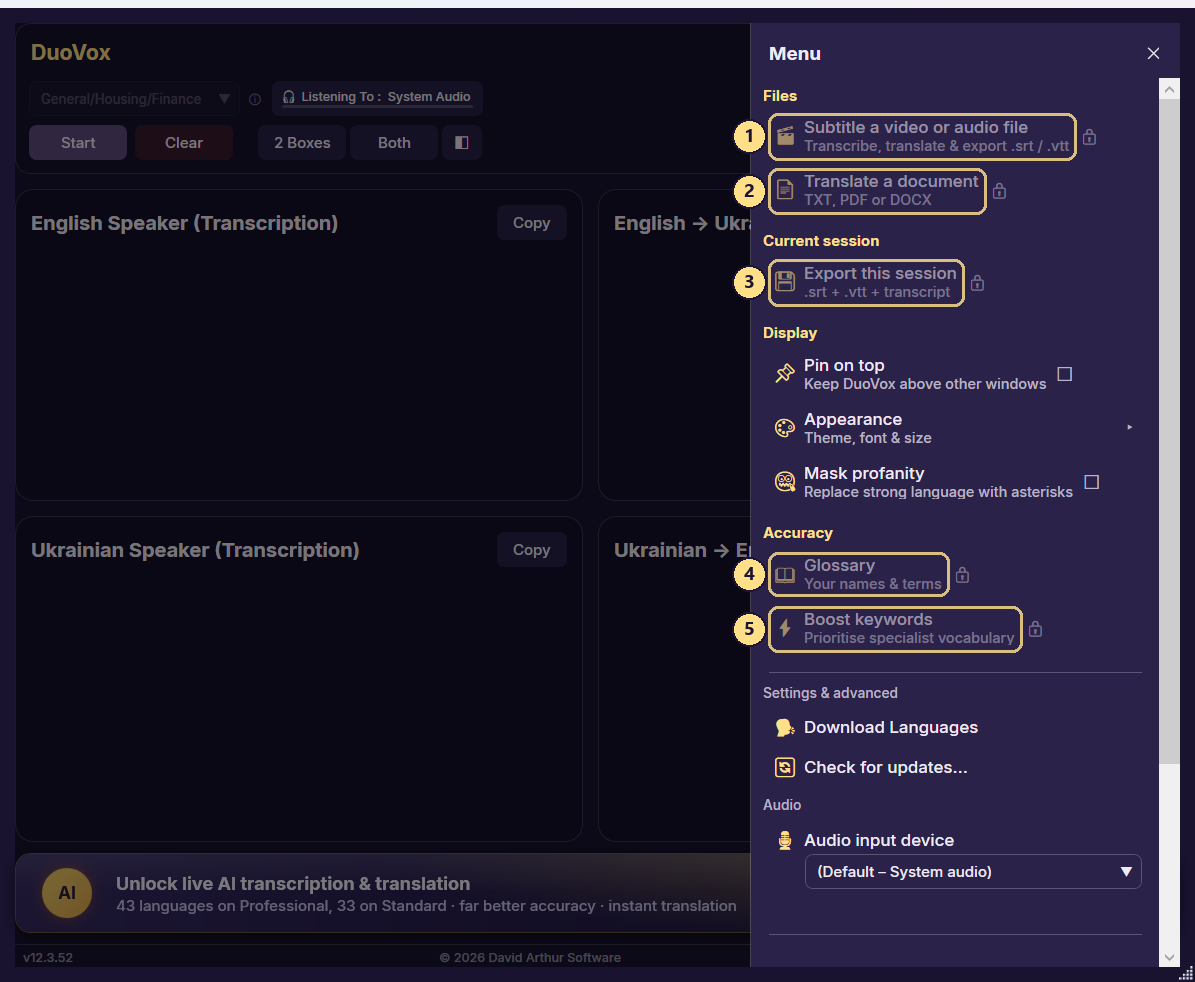
- 1Subtitle a video or audio file
- 2Translate a document
- 3Export this session
- 4Glossary
- 5Boost keywords
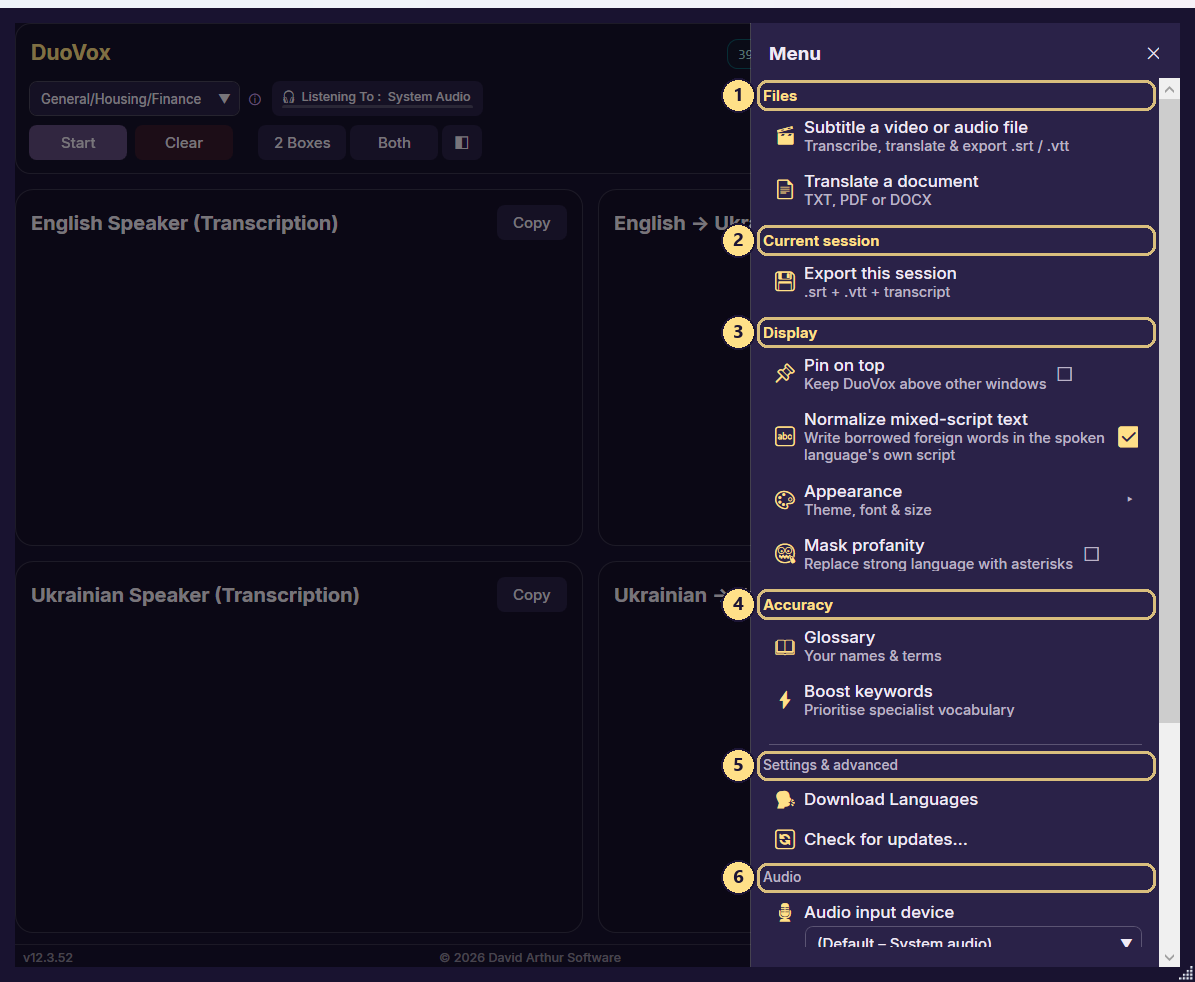
- 1Files
- 2Current session
- 3Display
- 4Accuracy
- 5Settings & advanced
- 6Audio
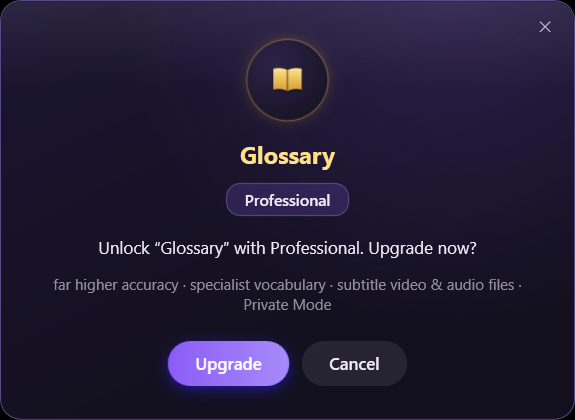
What each tier unlocks
- Every plan, including Free: Mask profanity.
- Standard and above: Translate a document, Normalize mixed-script text, the Topic and Dialect selectors, and the hours-remaining indicator in the header.
- Professional: Glossary, Boost Keywords, Subtitle a video or audio file, Export this session, and Private Mode.
Private Mode (the padlock button in the toolbar, Professional) clears the captions as soon as you stop and turns off copy and export for that session.
10. Keyboard Shortcuts
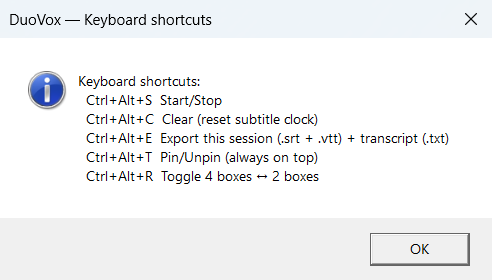
- Ctrl+Alt+S: Start / Stop
- Ctrl+Alt+C: Clear (reset subtitle clock)
- Ctrl+Alt+E: Export this session (.srt and .vtt subtitles, plus a .txt transcript)
- Ctrl+Alt+T: Pin / Unpin (always on top)
- Ctrl+Alt+R: Toggle 4 boxes / 2 boxes
11. Help & Support
Scroll to the bottom of the menu, below the dividing line, and you will find everything for when you need a hand:
- Keyboard shortcuts: the same list printed in section 10.
- User guide: opens this guide again at any time.
- Help: short explanations of each part of the app, without leaving DuoVox.
- Report a problem: tells us something has gone wrong – see below.
- Send a suggestion: an idea, or a feature you would like to see. Every one is read.
- About: shows your installed version and your device ID – useful information to have to hand if you contact support, or if you write to us about your data.
Report a problem and Send a suggestion are also on the About page, below the contact address and your device ID.
Reporting a problem
Describe what happened if you can – though you can send the report without writing anything, because the useful technical detail is gathered for you. You can add your email address if you would like a reply; leave it blank and the report is anonymous.
- What is sent: your description, your email address if you gave one, a technical log with all conversation text removed, the app version, your plan, and error counters.
- What is never sent: your conversations, translations, audio, contacts or files. DuoVox removes the words from the technical log on your own PC, before anything is sent.
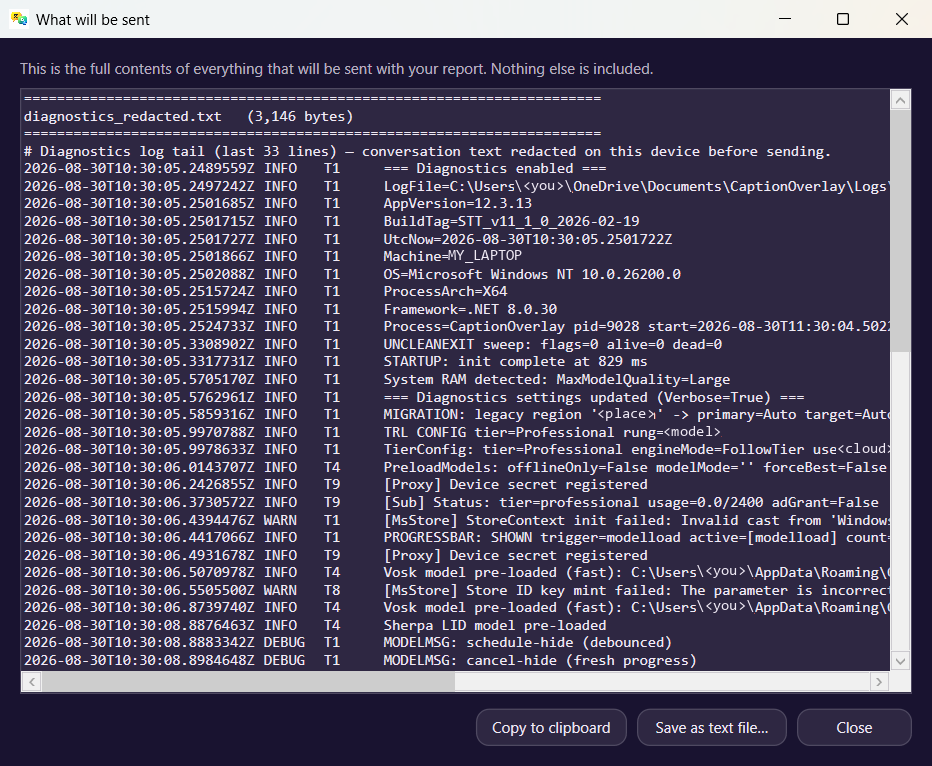
- You can check first: View exactly what will be sent shows the complete contents of the report on screen, with buttons to copy it or save it as a text file. If you would rather not send it, press Cancel and nothing leaves your PC.
Two tick-boxes let you choose how much to include – the technical log, and your settings (your two languages, the audio source and device, whether you were offline, and your display options). Both are ticked to begin with, and neither contains anything you said. Untick either one if you prefer.
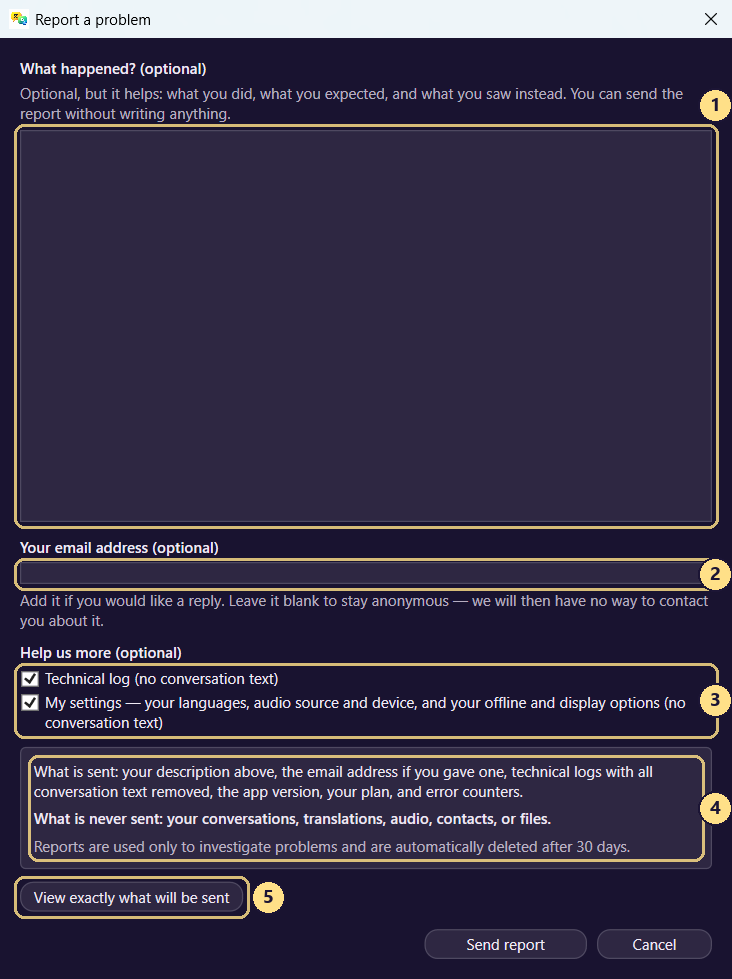
- 1What happened (optional)
- 2Your email address (optional)
- 3What to include
- 4What is sent and what is never sent
- 5Check the contents first
If DuoVox closes unexpectedly
If DuoVox stops responding or closes on its own, it makes a note of what happened. The next time you start it, it offers to send that as a report – the error details are attached for you, so you can simply press Send report, or press Cancel if you would rather not. Nothing is sent unless you choose to send it, and you are only asked once per incident.
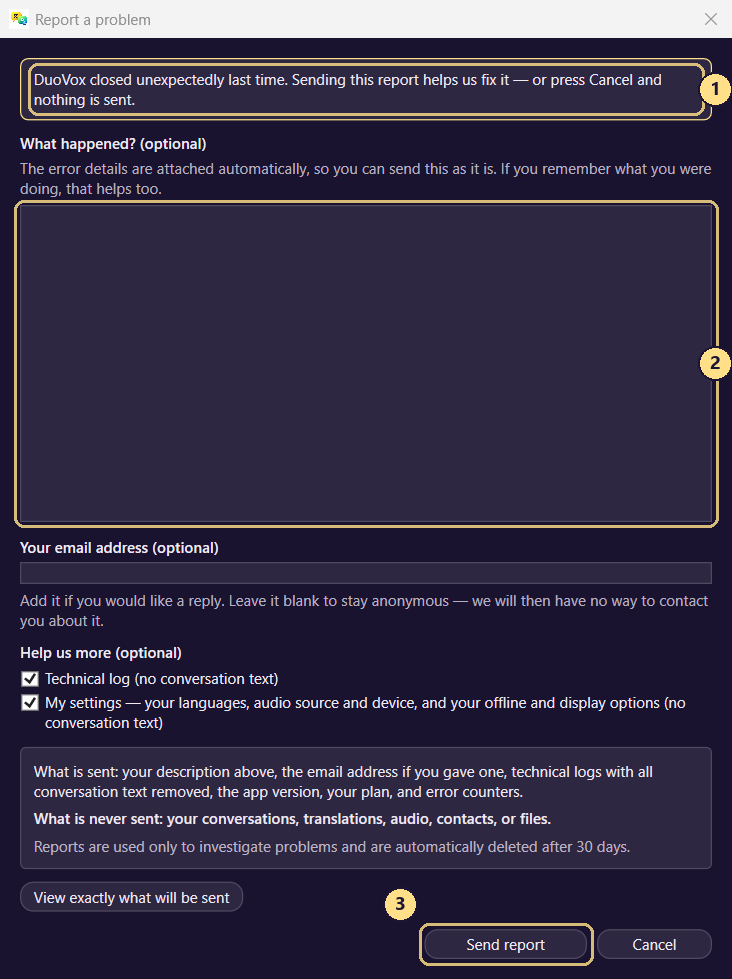
- 1Why you are seeing this
- 2Add anything you remember (optional)
- 3Send, or press Cancel
Sending a suggestion
Send a suggestion is for an idea or a feature you would like to see, rather than something going wrong. It sends what you write, your email address if you give one, and the app version and plan – no logs, no diagnostics and nothing from your conversations.
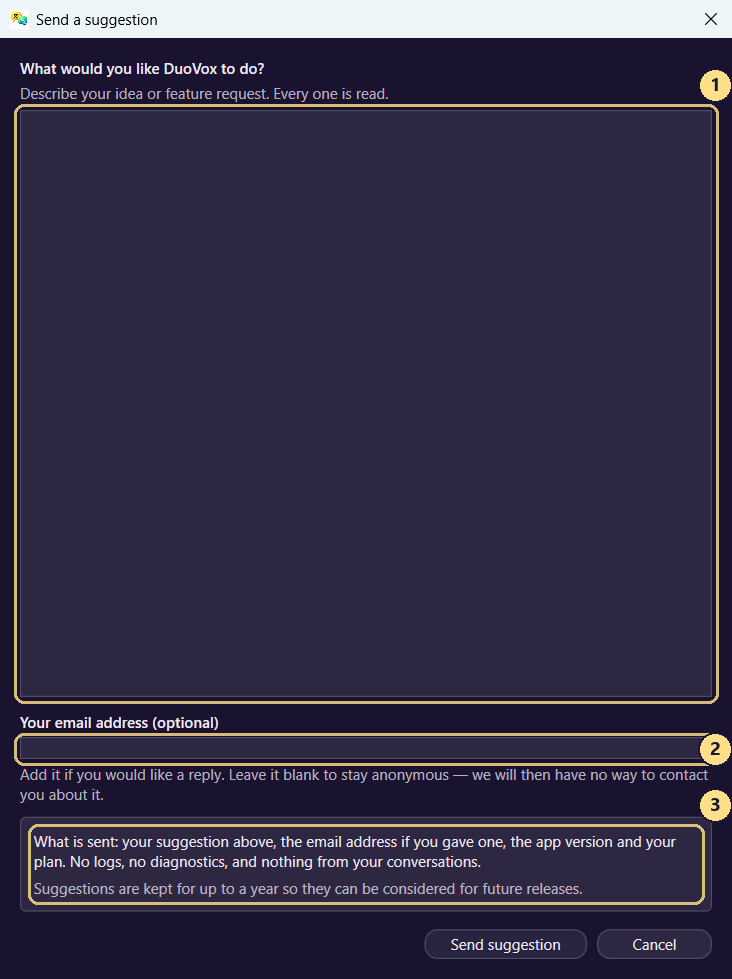
- 1Your idea
- 2Your email address (optional)
- 3What is sent, and how long it is kept
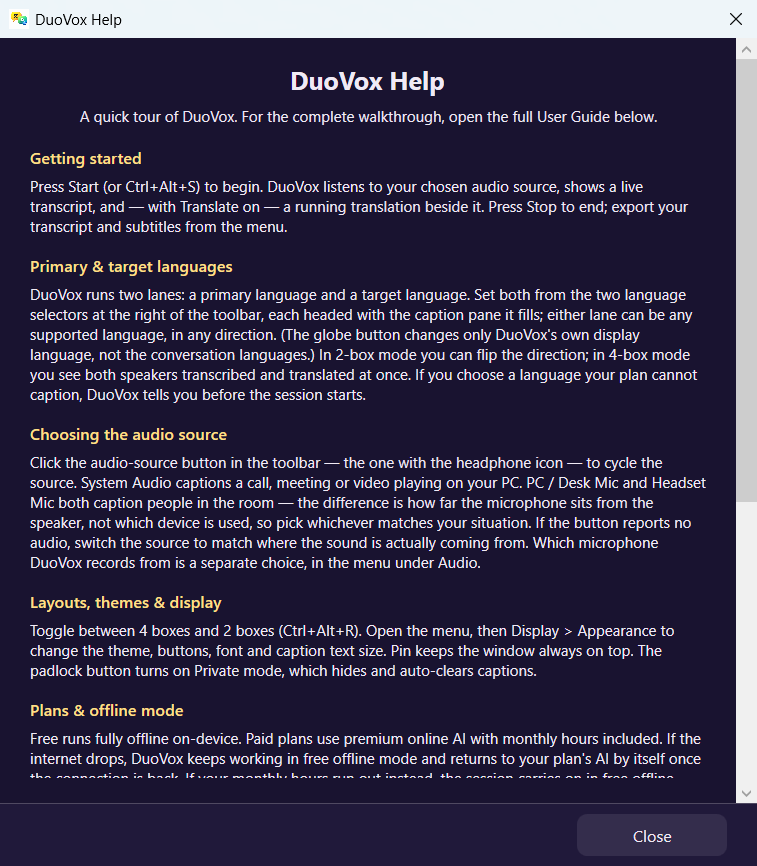
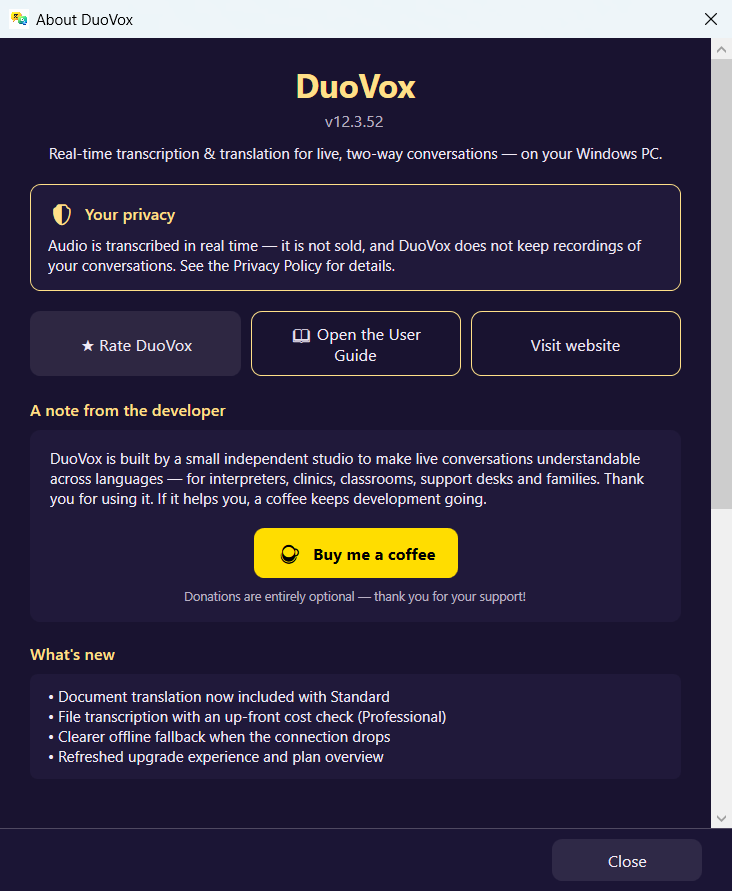
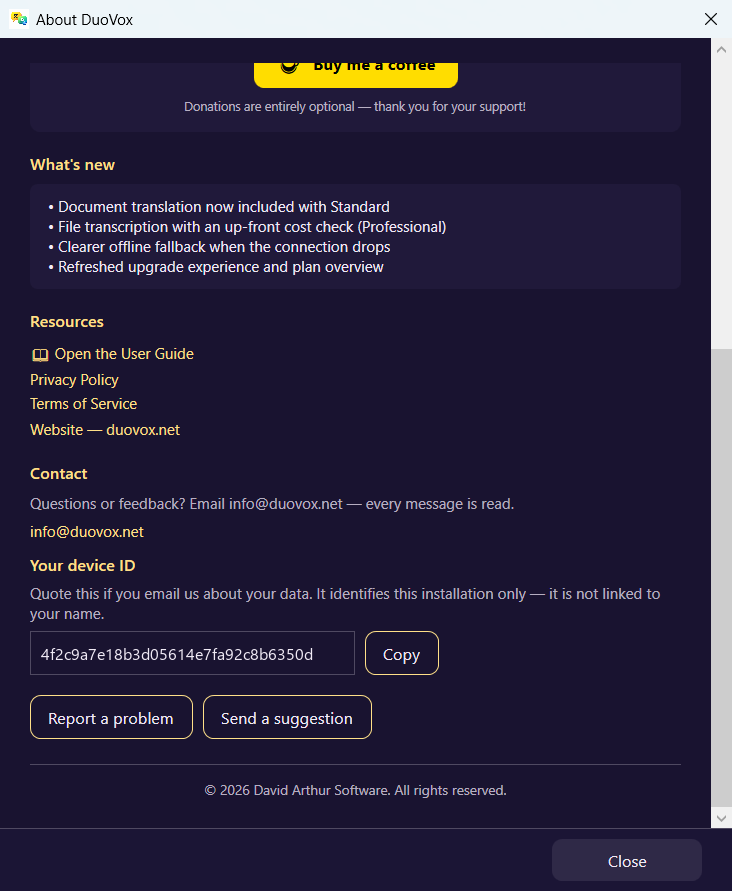
Questions or feedback are always welcome: email info@duovox.net and every message is read. You can also visit duovox.net for the latest news, the privacy policy and the terms of service.
If DuoVox helps you, an optional “Buy me a coffee” keeps a small independent studio going. Thank you for using DuoVox.